
Introduction
Have you purchased the XD Duo Dualizer kit and now looking to get that second battery and dualizer installed on your Juggernaut XD Duo? Follow these instructions for steps on how to do so!
You will need the following tools to do this:
Phillips Screwdriver
Blue Locktite
3mm Allen Key
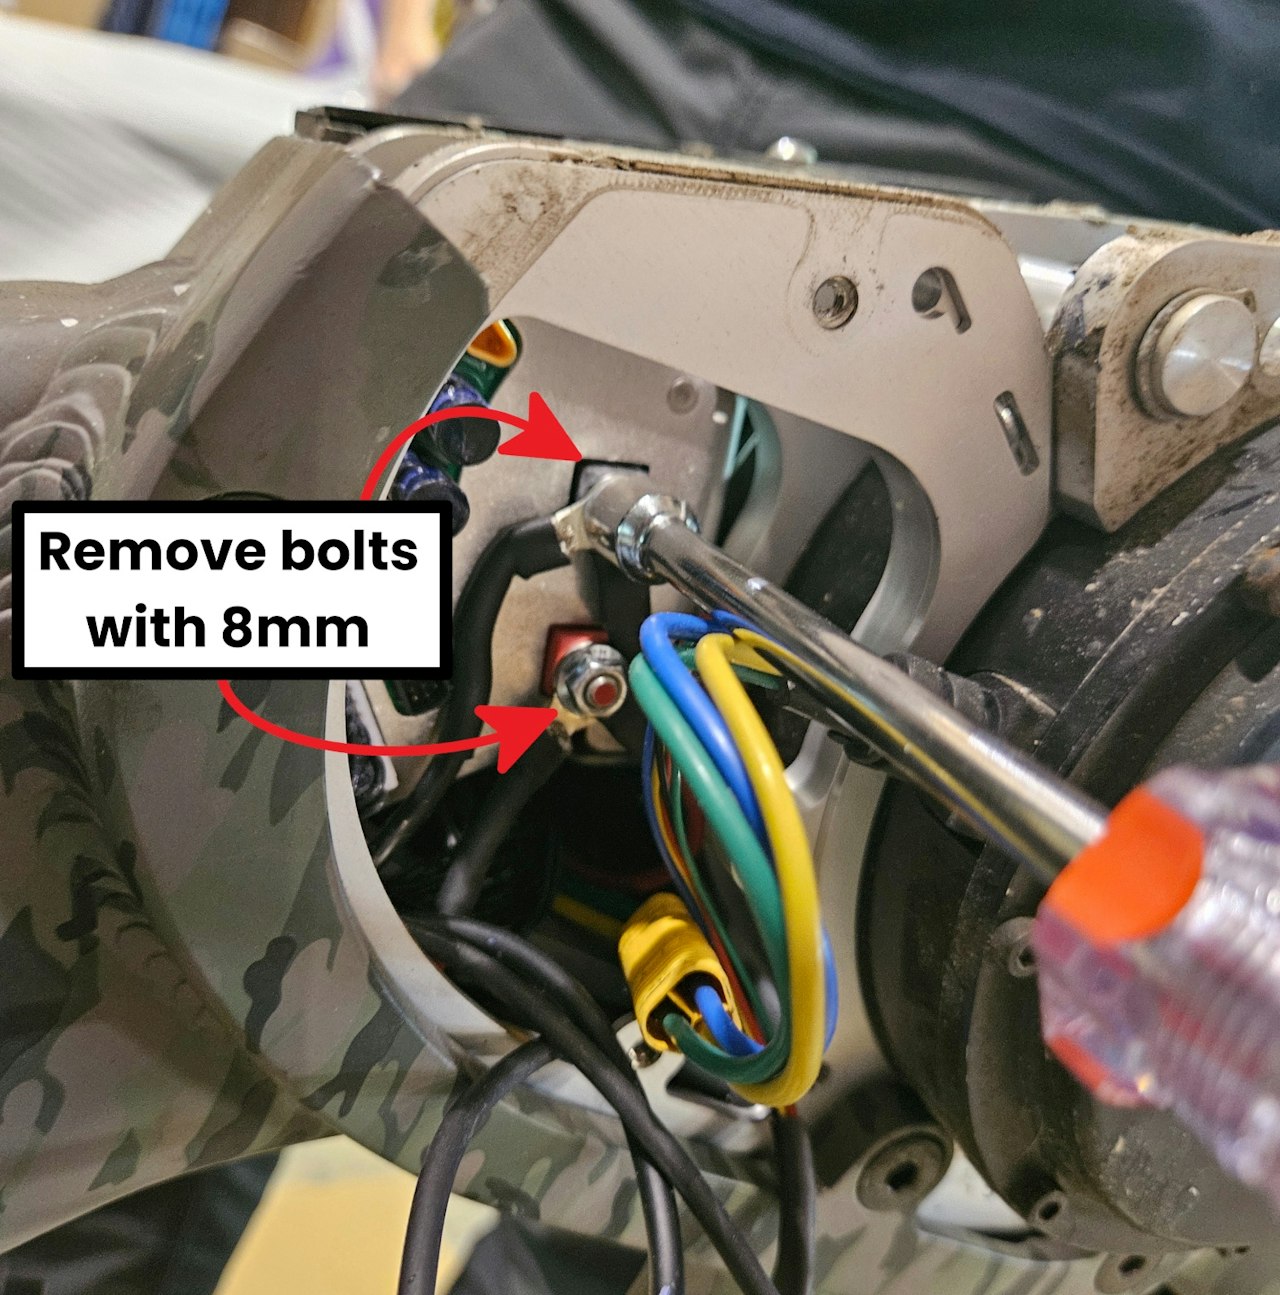
Ratcheting Wrench with 8mm Socket
Having an extension will make this job easier!
Electrical Tape
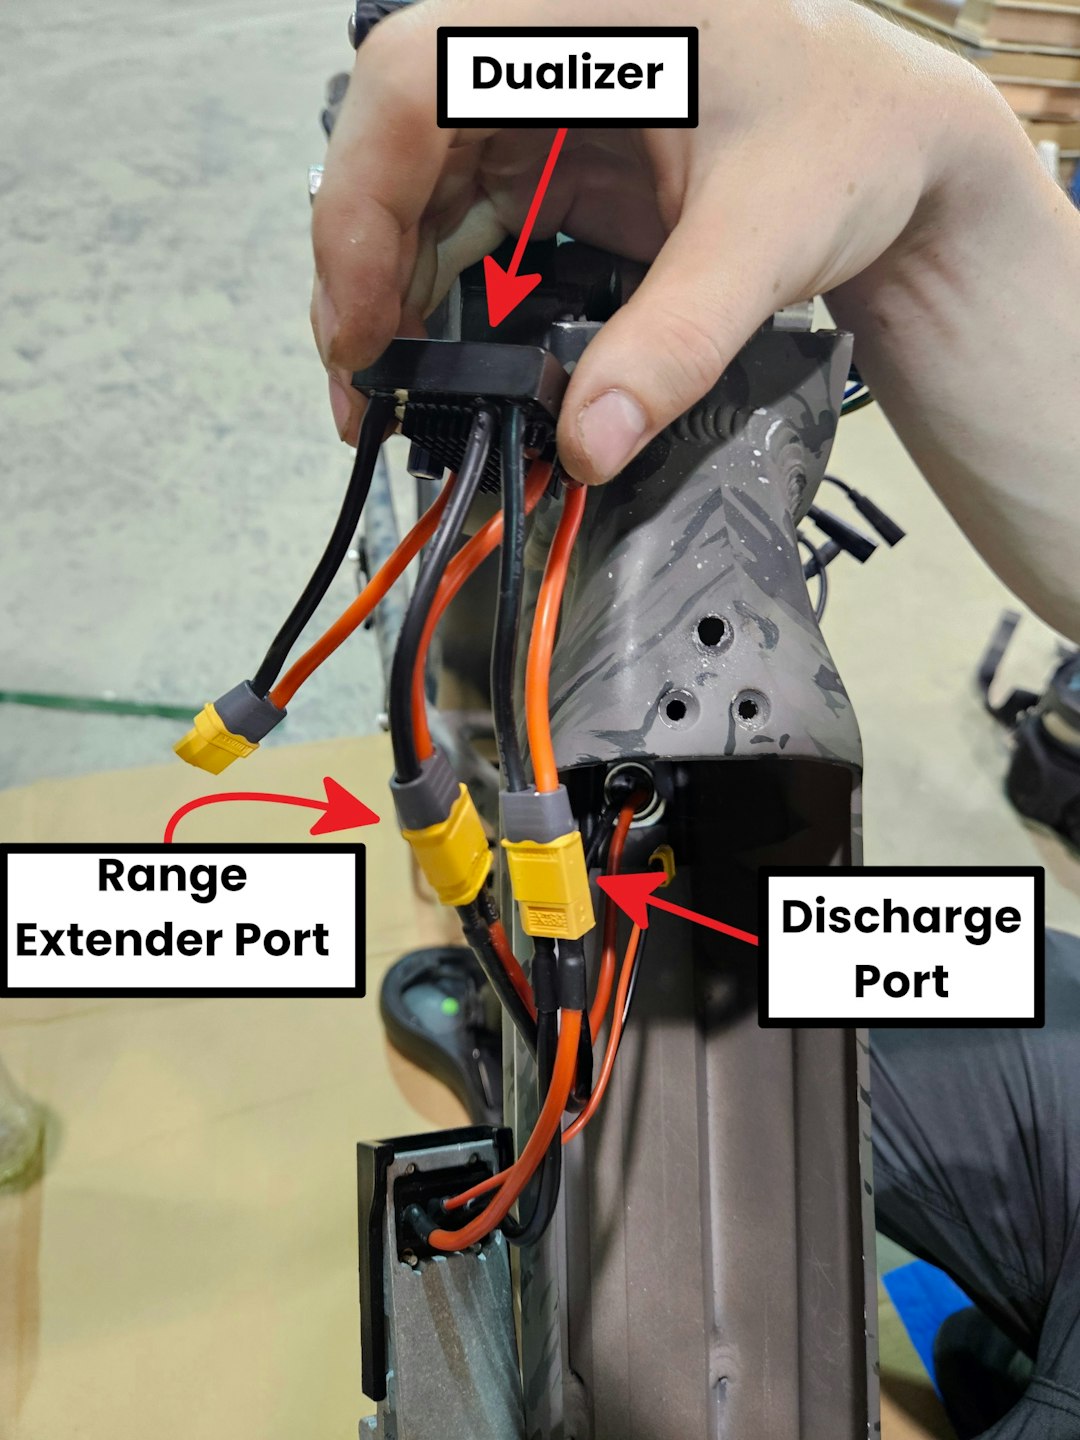
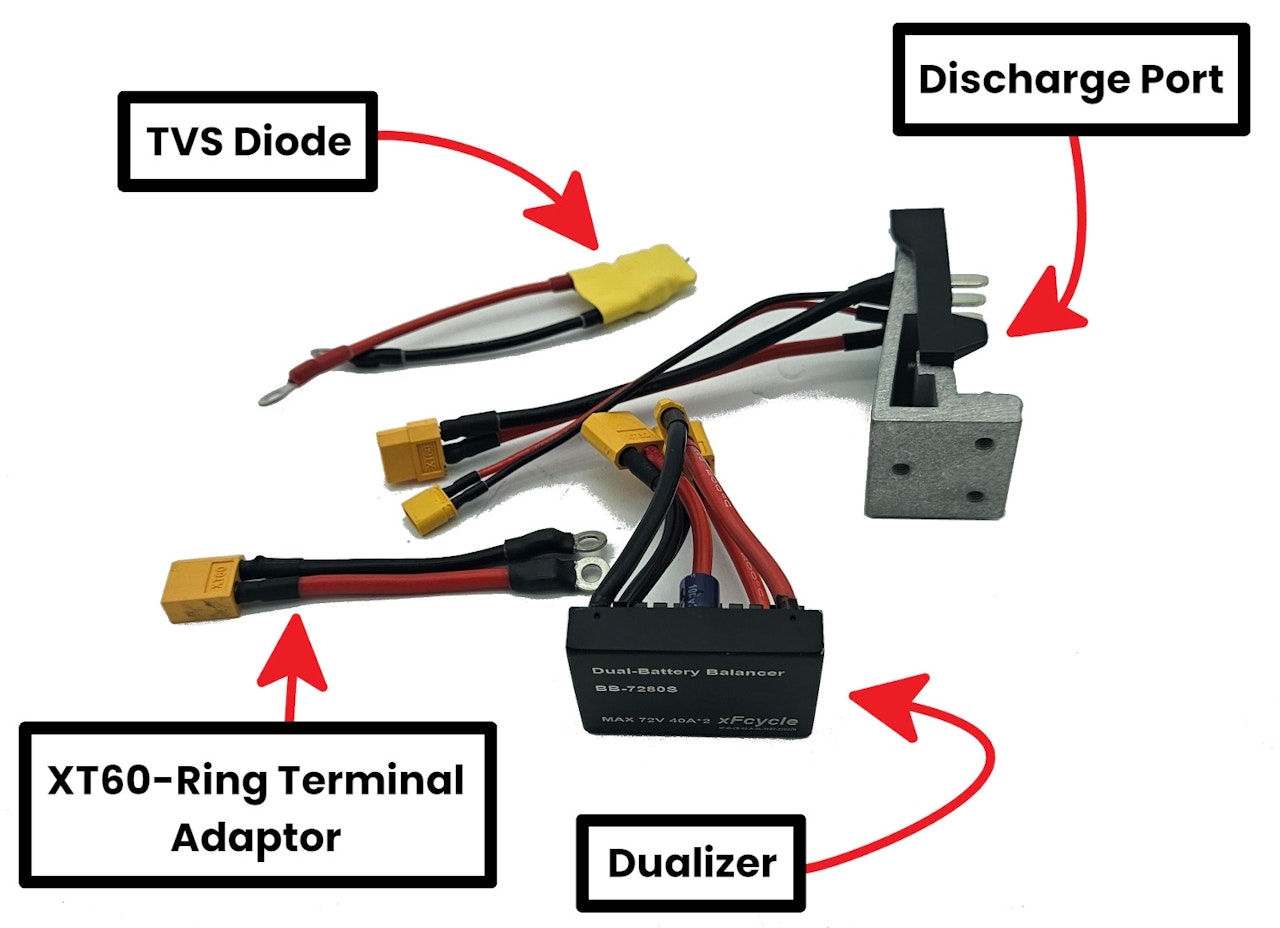
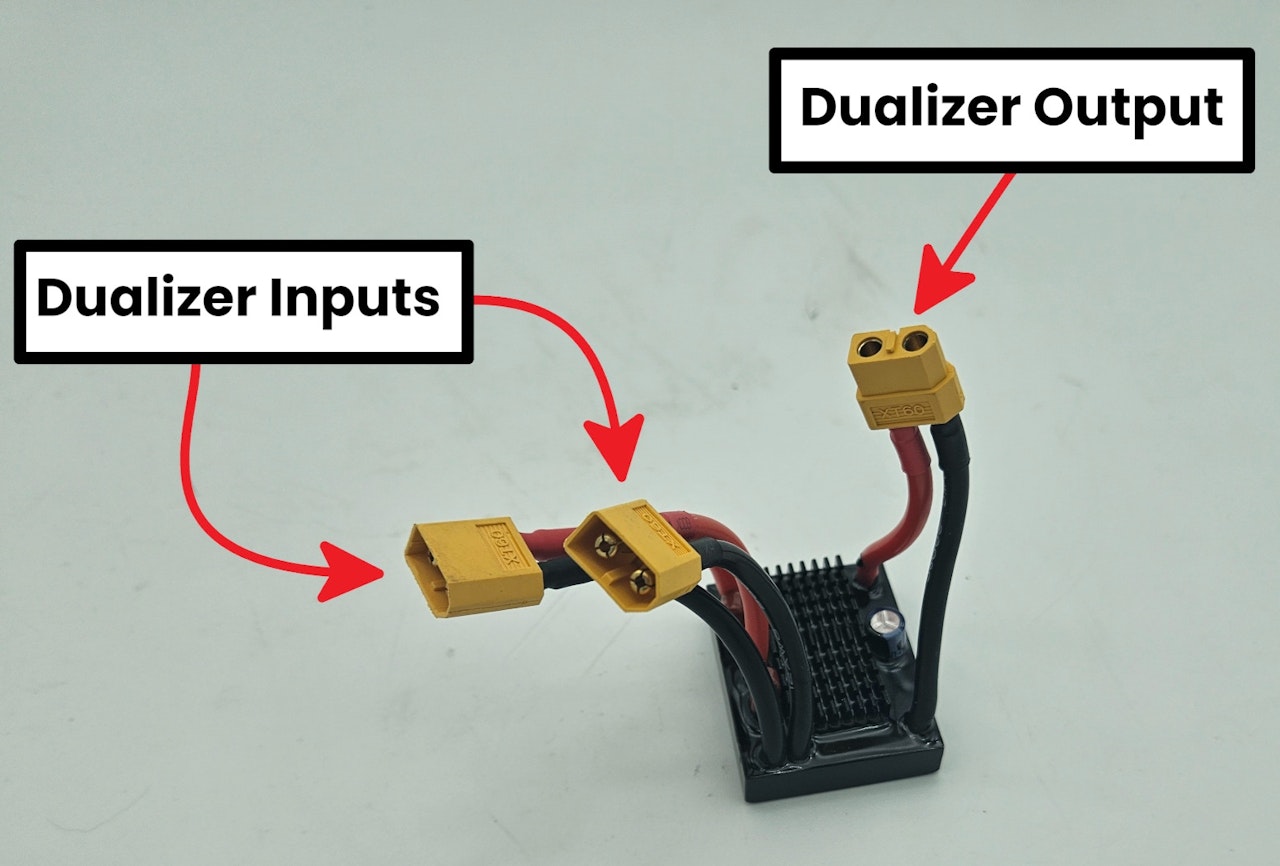
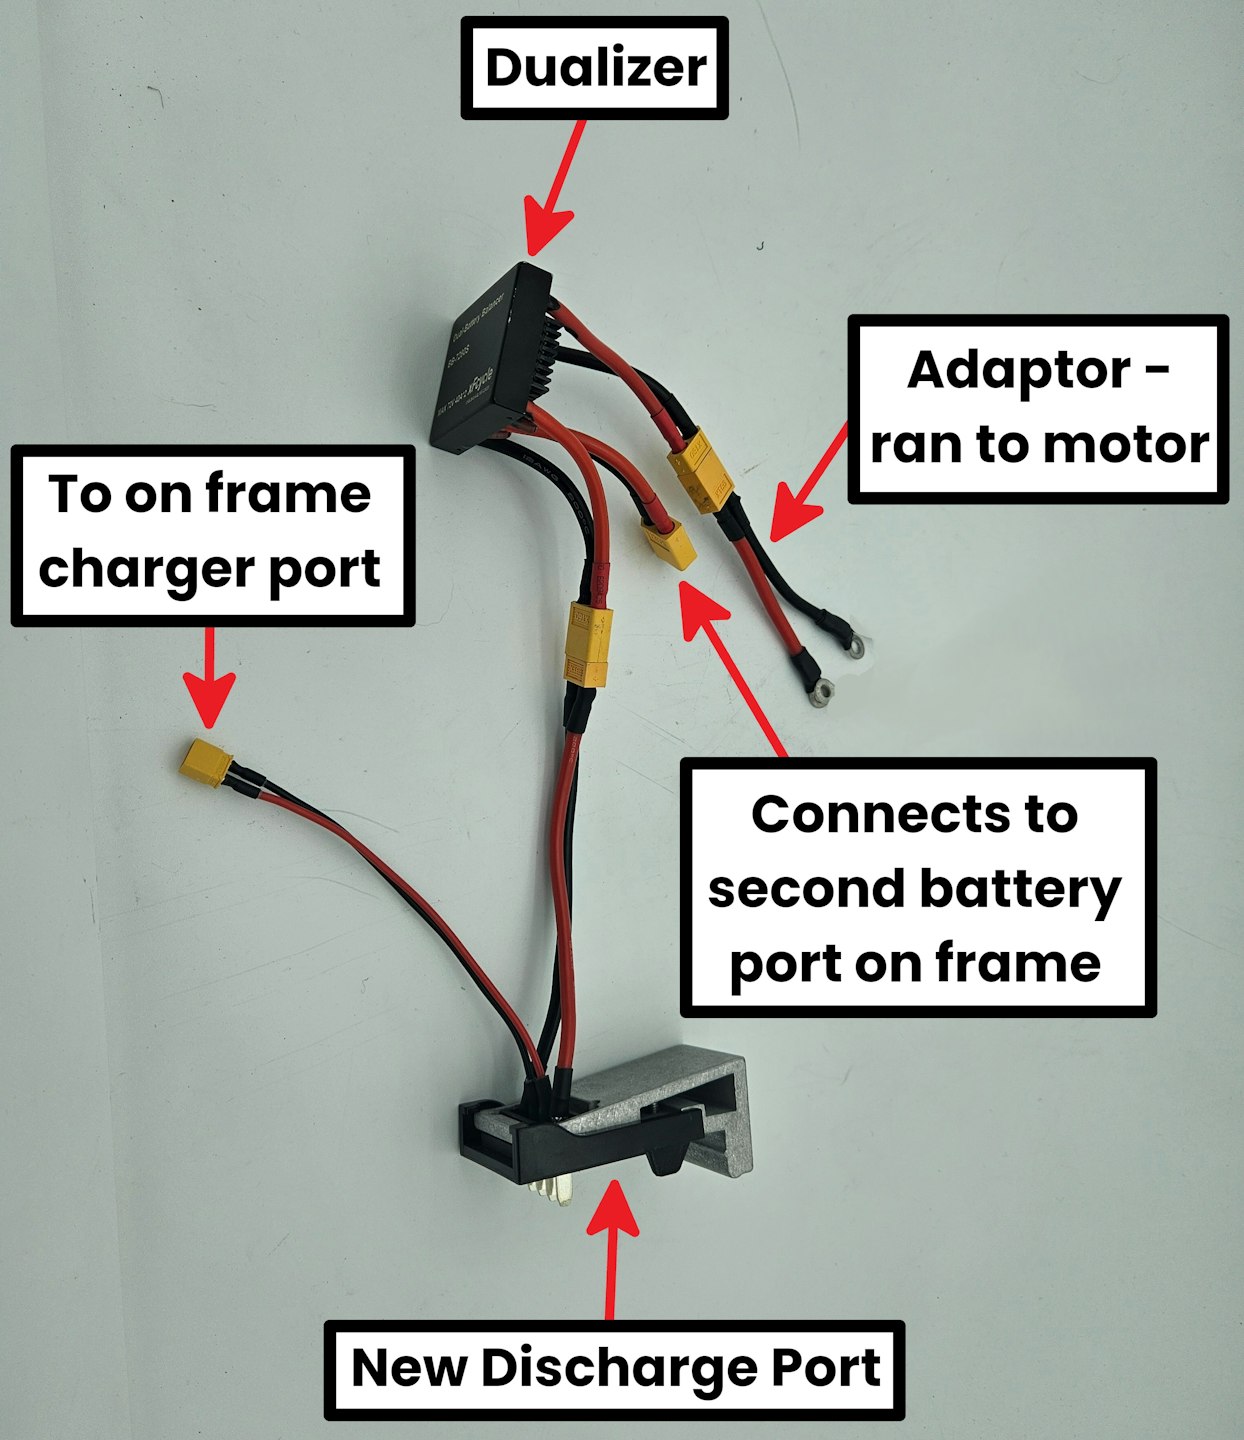
Consult the second image within this step to see the names of each part in the Dualizer Kit. Keep these in mind working through the guide
Step 1
Remove the main hidden battery from your Juggernaut XD Duo
Remove the service cover from the bike to access the controller and other electronics.
Use a Phillips head screwdriver to remove the two screws as demonstrated in the video then pull away the cover

Step 2
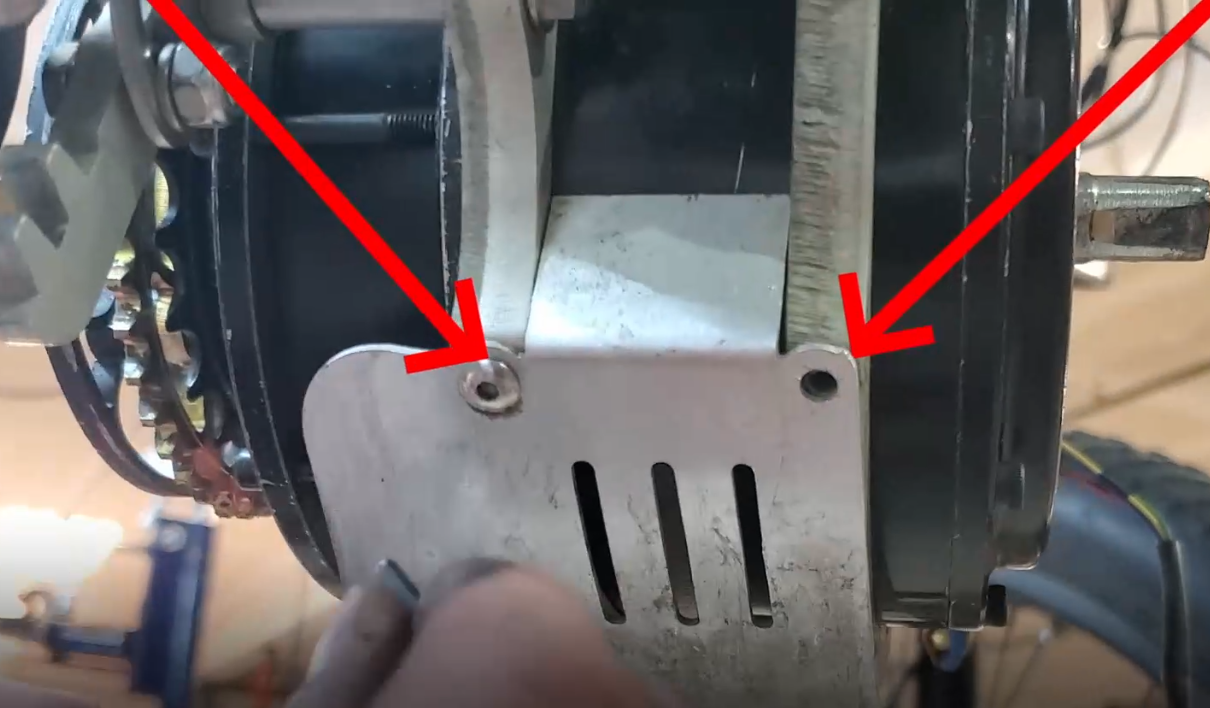
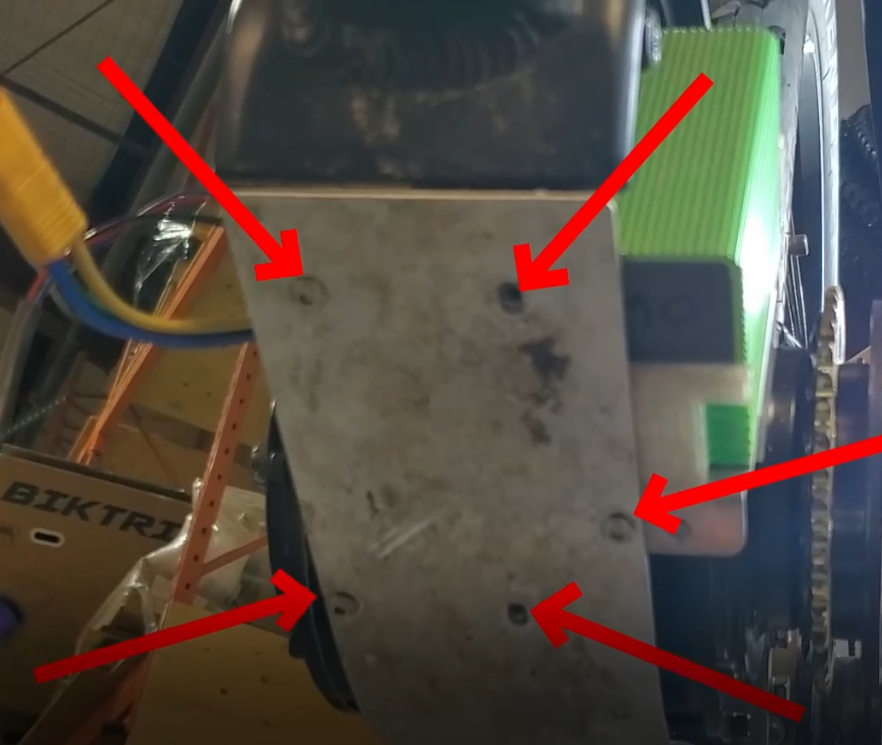
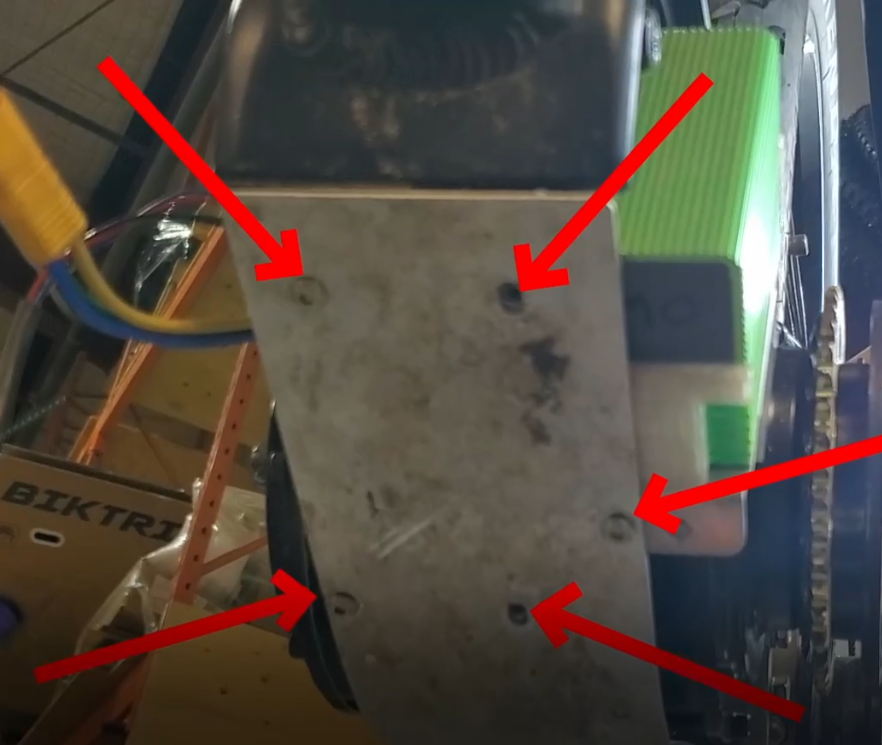
Go to the metal bash guard on the bottom of the motor.
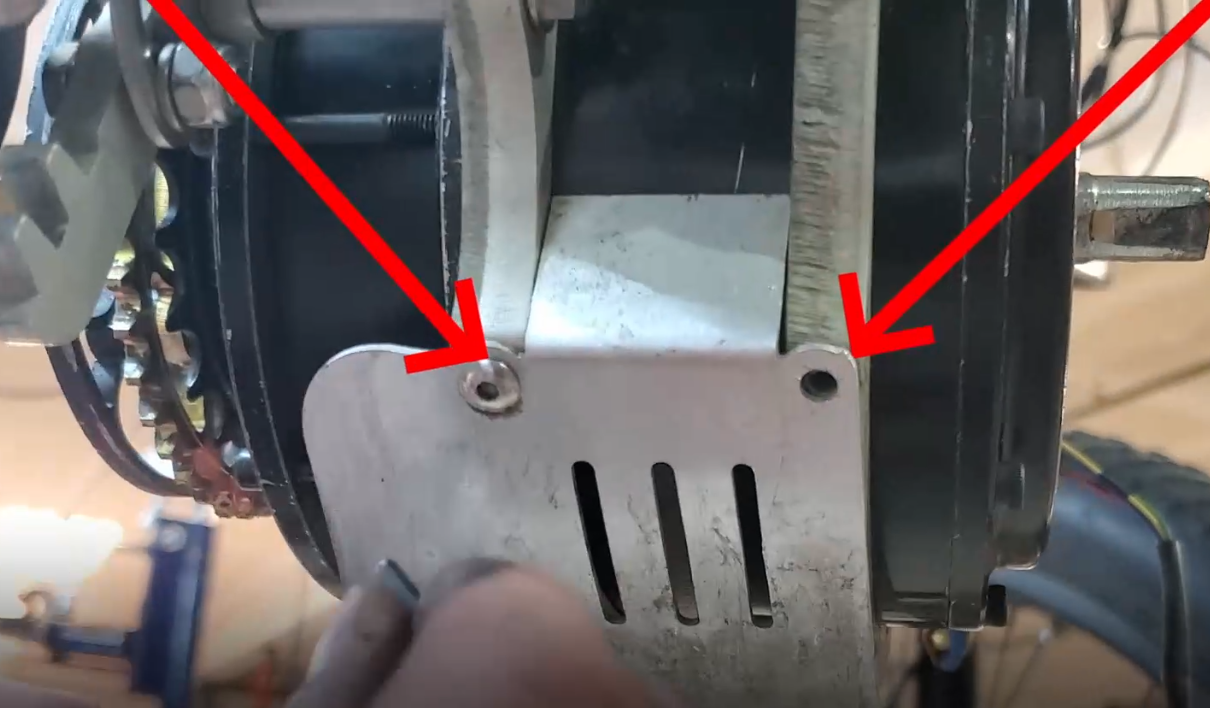
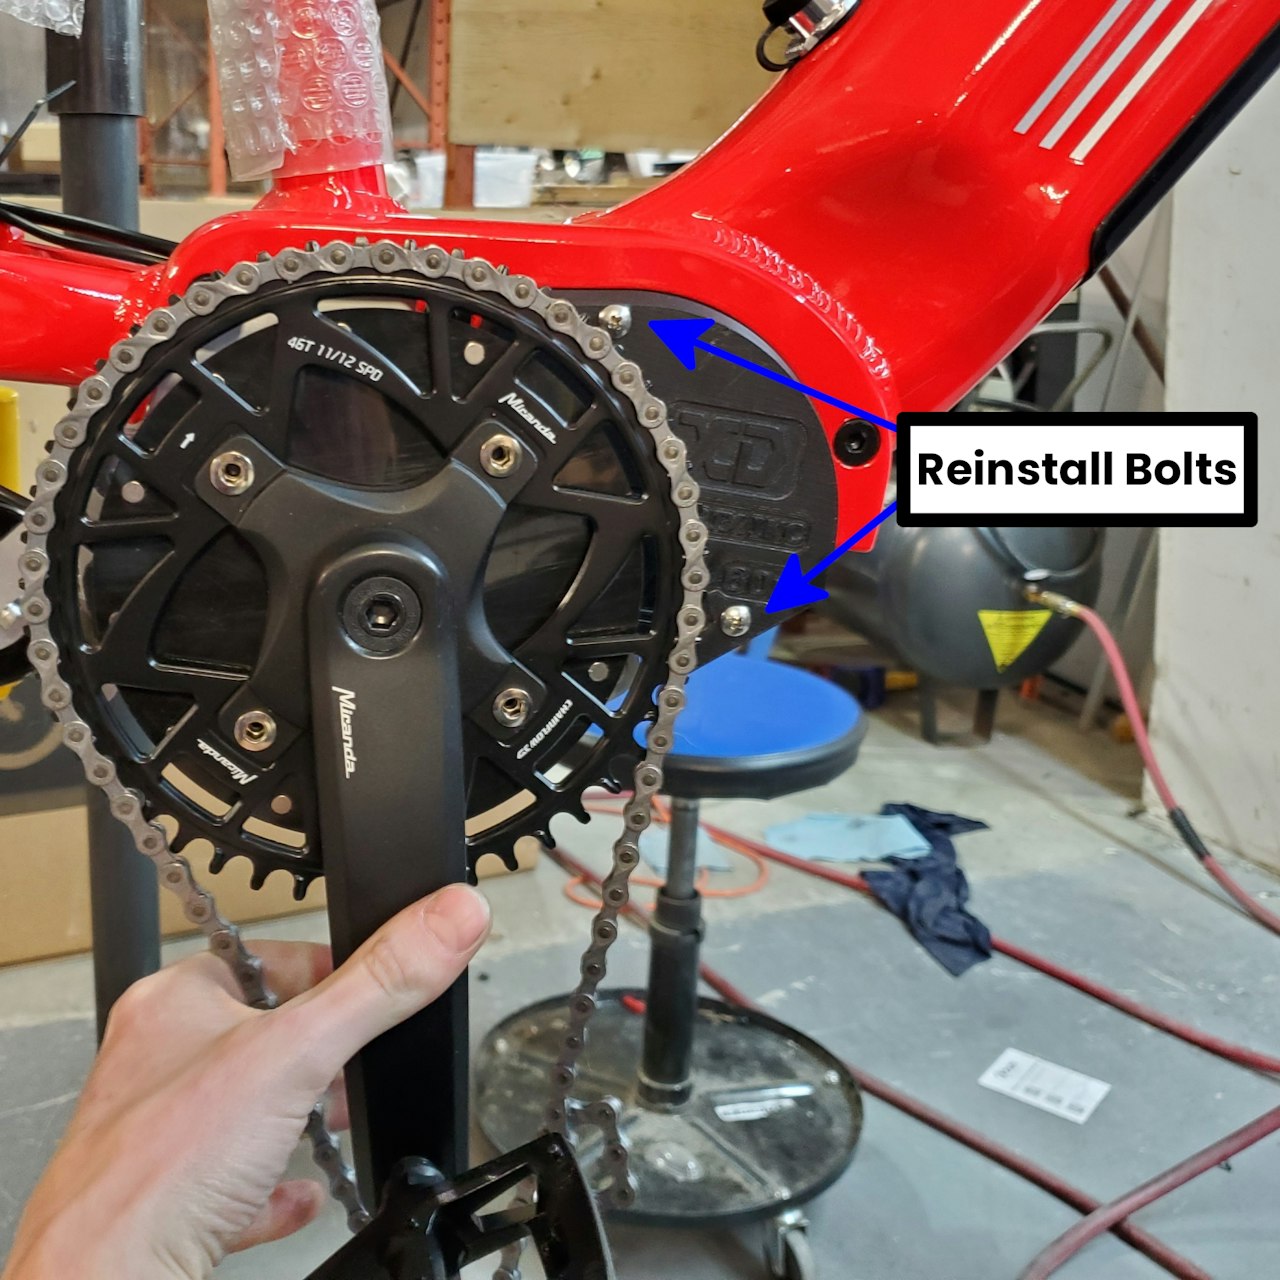
Remove all 7 bolts securing this part to the bike with a 2.5mm Allen Key.
Remove the bash guard off from the bottom of the motor. This will make accessing any connectors easier!
There might be a plastic wedge on the front side between the frame and this plate - keeptrack of this for reinstallation!

Step 3
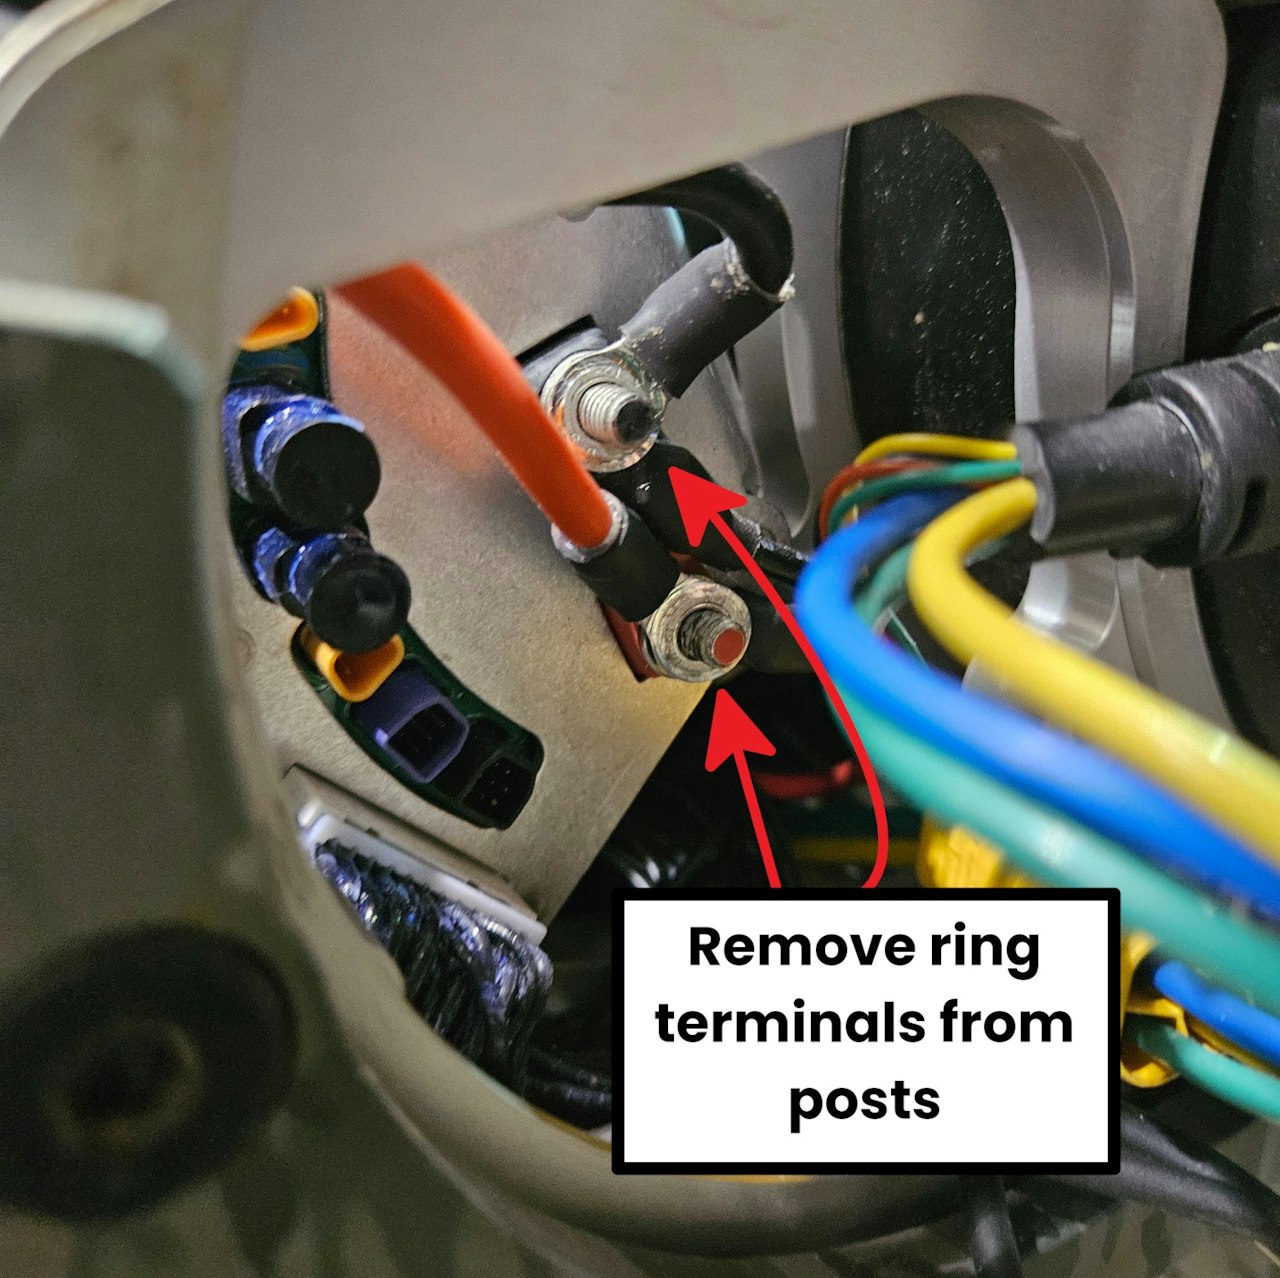
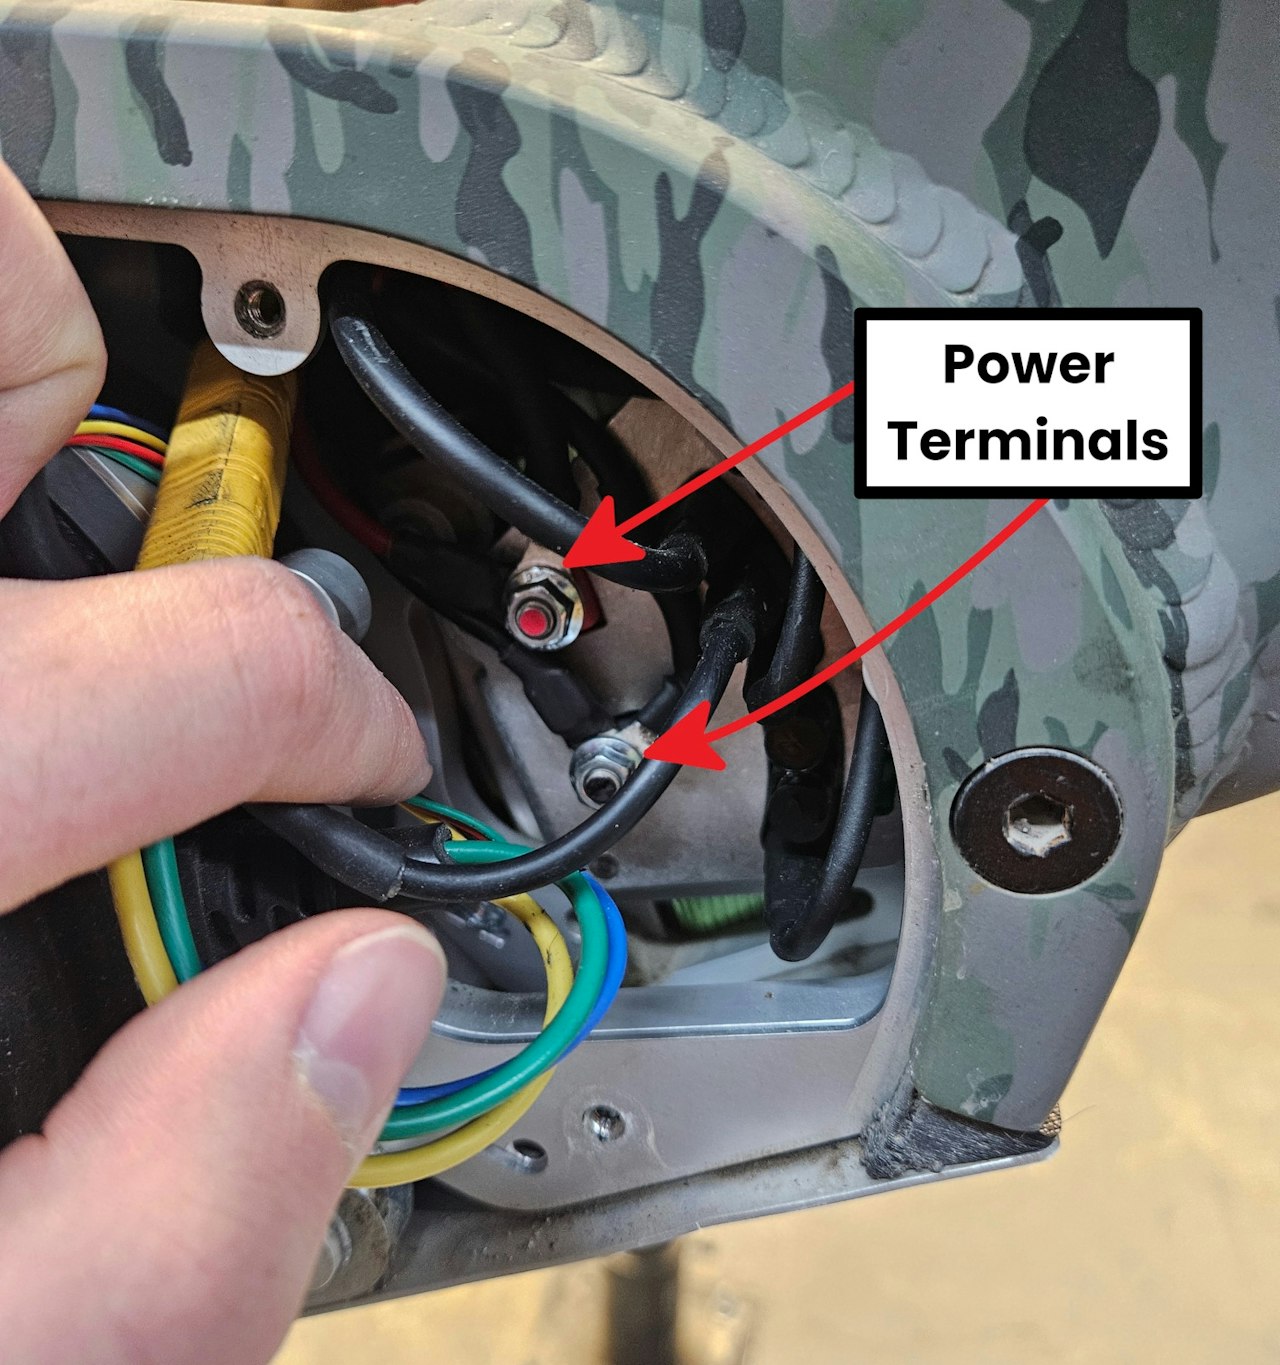
Locate the "Power Terminals" in the area under the service cover.
Remove the Power Terminal Bolts with a 8mm Socket.
Remove the ring connectors positioned on the TOP of each terminal.
There will be multiple ring connectors on each so don't remove all of them! You should only need to remove the TOP-MOST TERMINALS.
For now, loosely reinstall the bolt on top of each terminal for safekeeping. We will return to these later.

Step 4
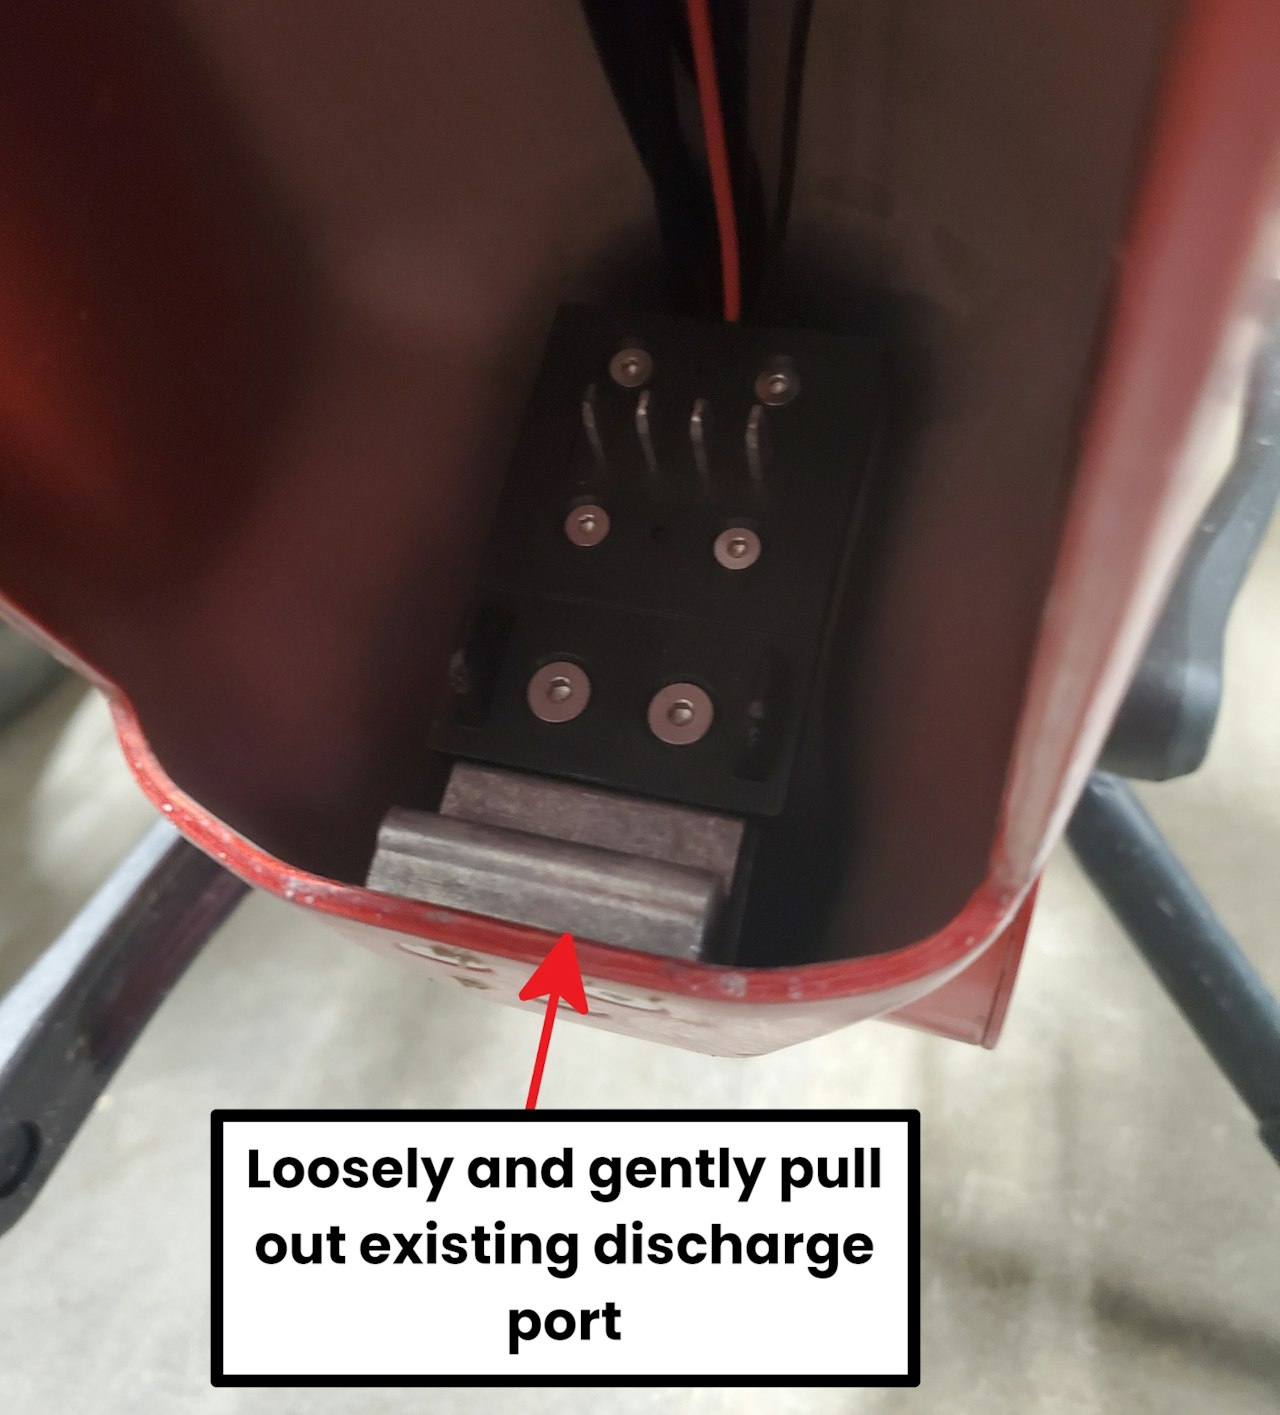
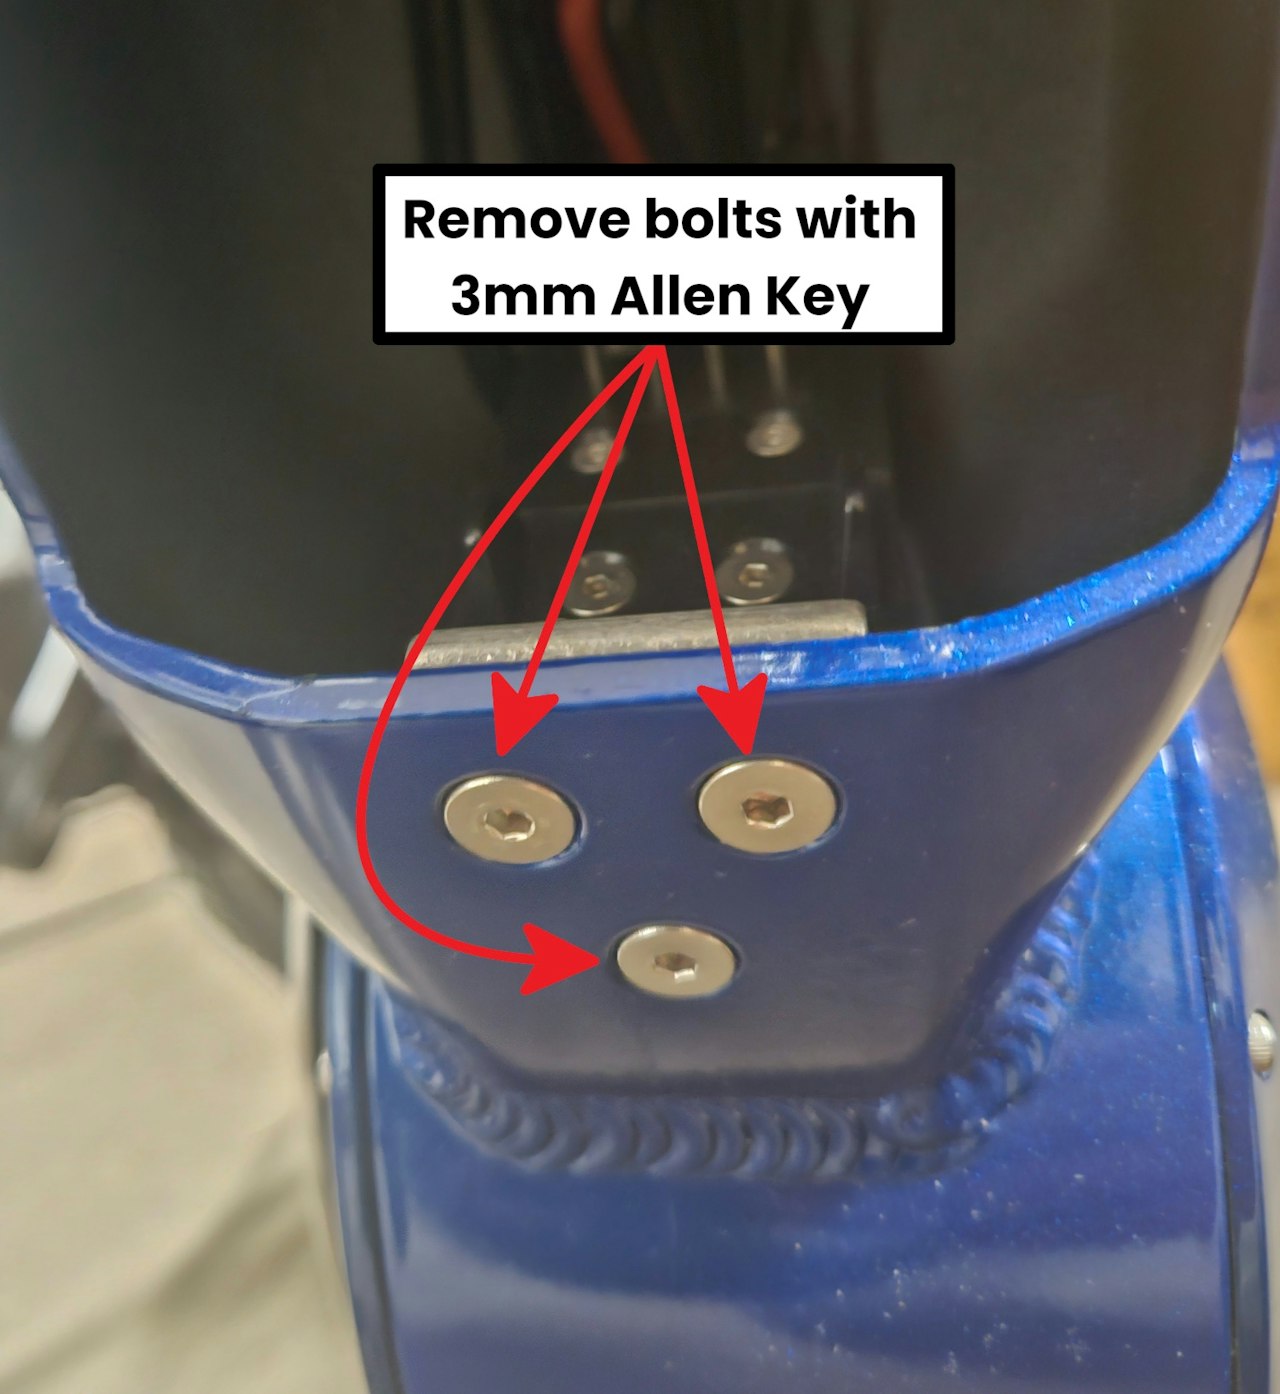
Move to the discharge port on your eBike. Remove the three circled screws with a 3mm Allen Key.
Grab the discharge port, with screws removed, and loosely start pulling it out of the bike.
Look at the wires coming out from the discharge port. There should be two sets of wires coming out from this - 4 wires in total.
Two of these are for the main power which you disconnected in the previous step. You can pull these out from the frame
The remaining two will be attached to an XT30 Connector that runs to the charging port on the bike. You will need to remove the electrical tape on this connection. Then gently disconnect this.
With all 4 wires from the discharge port disconnected you can pull it out and remove it from the eBike.
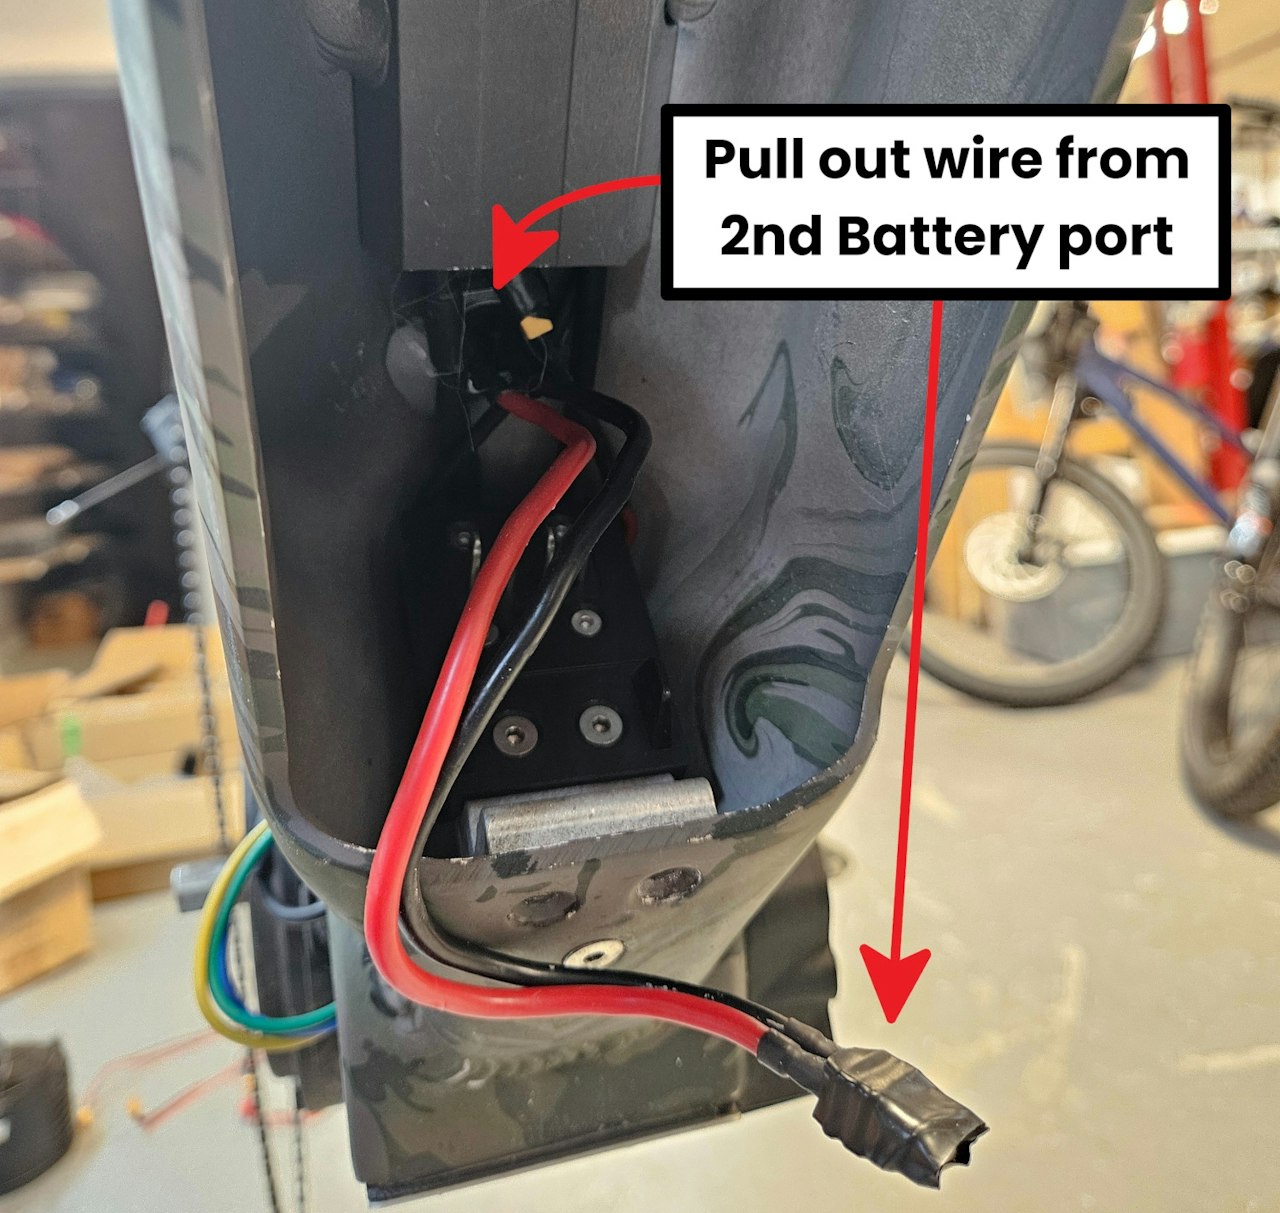
Locate the wires coming from the "Range Extender Port" from the inside of the bike. Check that those wires, and the XT60 connector are accessable.

Step 5
Take the Dualizer from your kit. Refer to the first image here for the names of the dualizer connections.
With the dualizer in hand first connect one Dualizer Input to the connector on the "Range Extender Port".
Next, connect the second Dualizer Input to the XT60 Connector on the Battery Discharge Port which came in your kit.
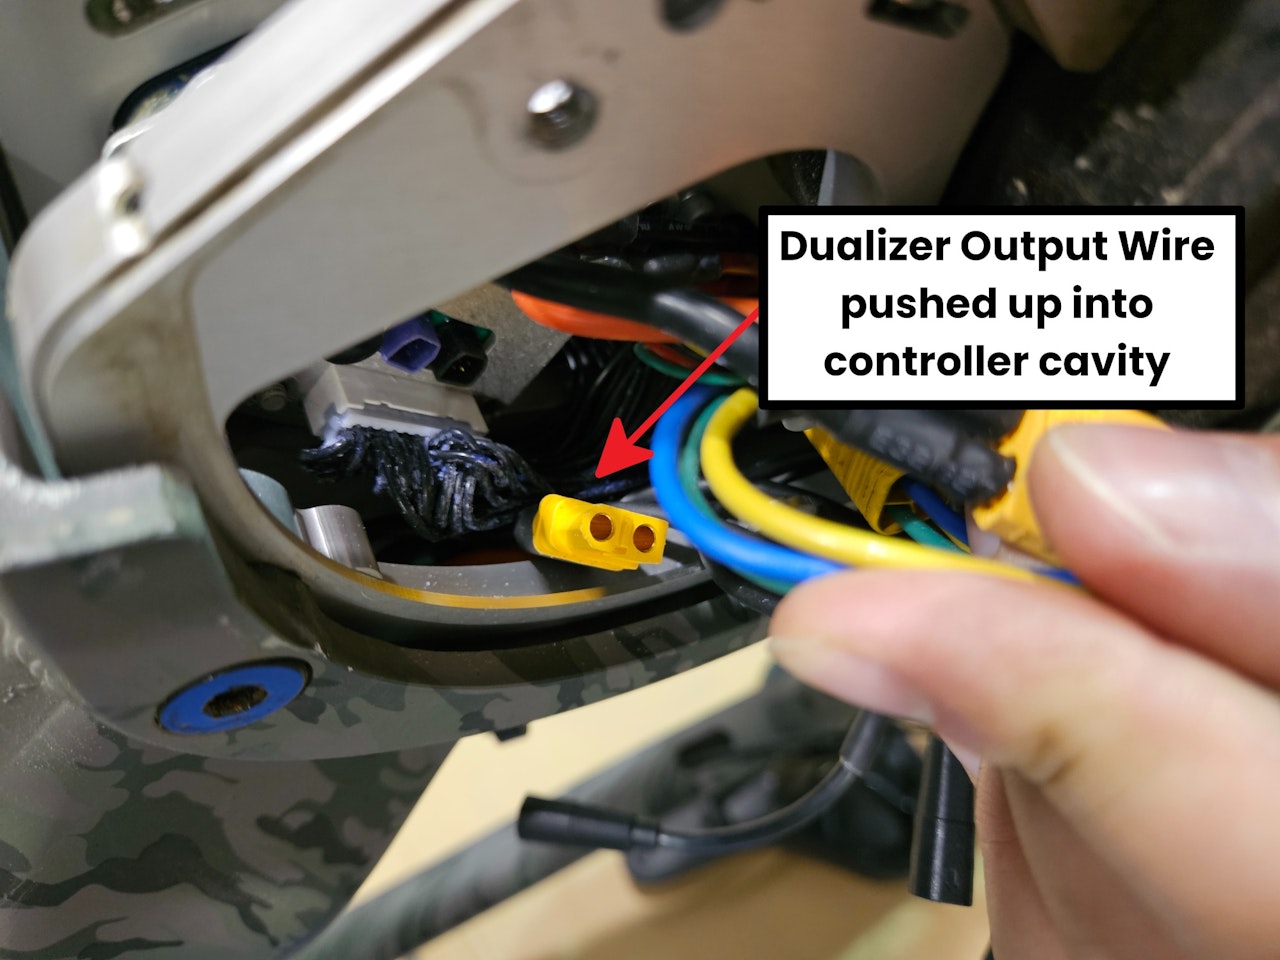
Lastly, thread the Dualizer Output up the downtube, into the controller cavity of the bike
If you are having trouble threading this wire up into the controller cavity connect it to the "XT60-Ring Terminal Adaptor" and use that extra length to pull it through!

Step 6
Take the charge port wire that you unplugged in "Step 4". Plug the end in your bike into the new charge port connector coming from the new discharge port.
These connectors should match! If not please contact Biktrix support.
Plug the "XT60 - Ring Terminal" adaptor into the Dualizer output which you ran into the Controller Cavity on the eBike.
The XT60 connector on the Dualizer Output should be sitting within the controller cavity - this is necessary to get everything put together in the end!
You should have a setup that looks similar to the final image, just installed into your eBike, when you are done

Step 7
Remove the bolts you had stored on top of the power terminals in "Step 3".
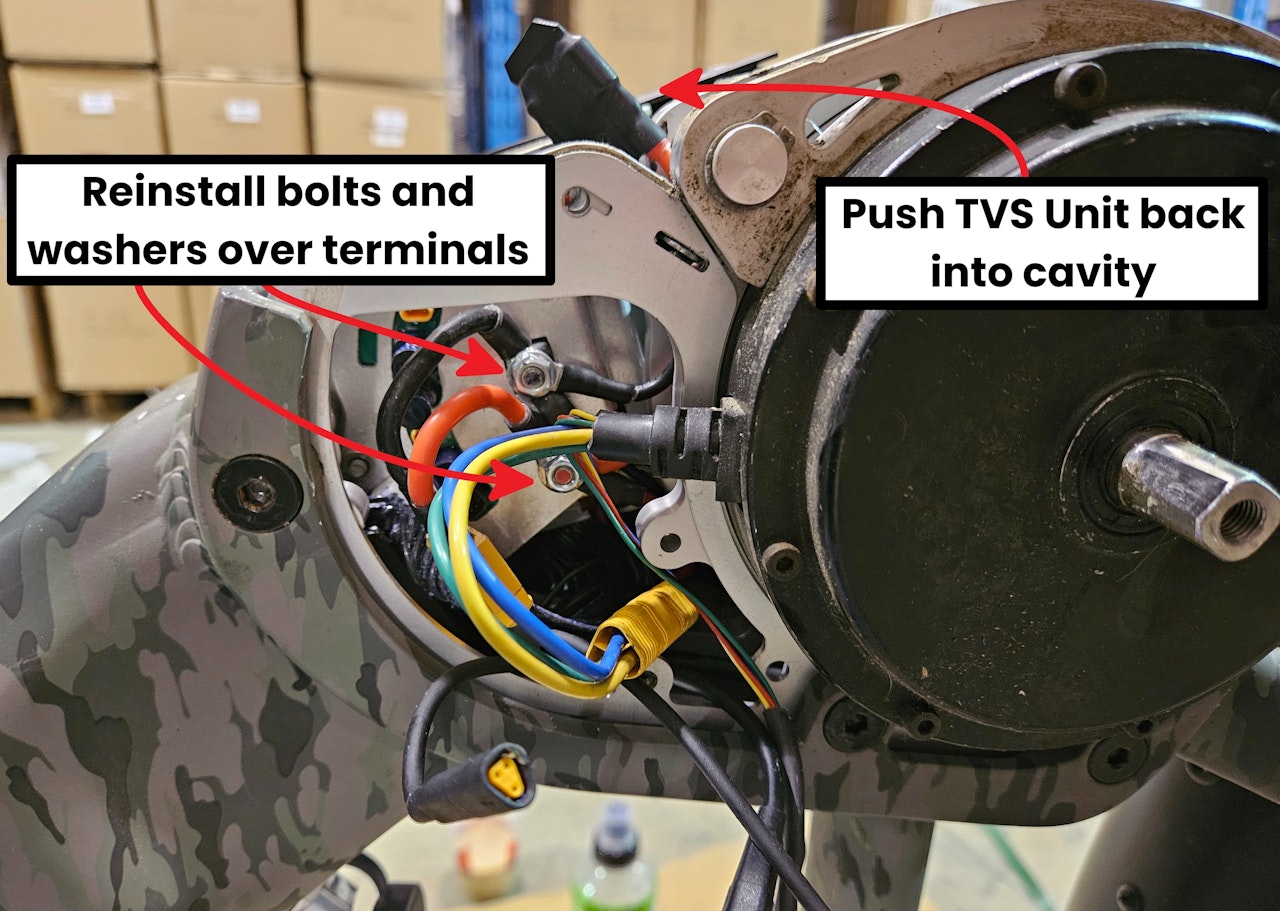
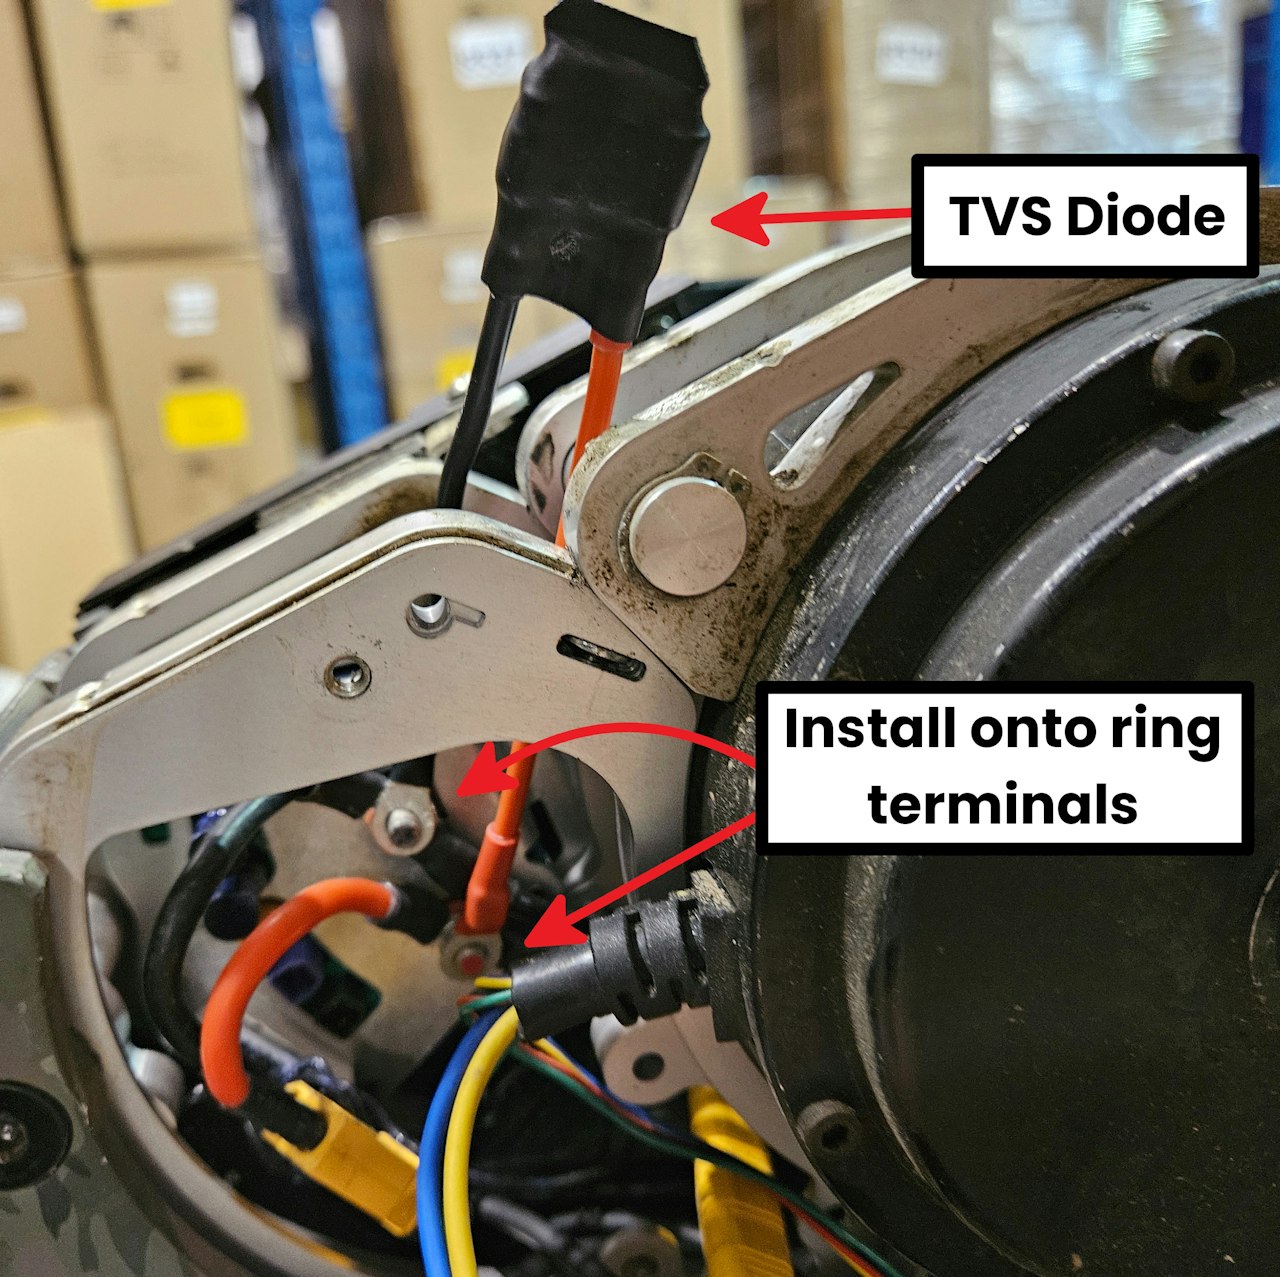
Slide the XT60-Ring Terminal adaptor over the controller's power terminals, matching the positive terminal and negative terminals - black to black, red to red.
Take the TVS Unit. Install it on top of the XT60-Ring Terminal Adaptor, onto the controller's power terminals, matching the Black with the Negative Terminal, and the red for the positive!
If the terminals do not have paint on top of them to indicate this the Positive/Red terminal is on the top and the Negative/Black is on the bottom.
Install the bolts previously holding these secure back onto the terminals with the 8mm socket.
Step 8
Before advancing further, confirm that everything is connected properly! This includes:
Smaller, XT30 connector coming from discharge port leading to on-frame charging port.
Larger, XT60 connector coming from the discharge port to one Dualizer input.
XT60 connector running from second, range extender battery port on bike frame to second Dualizer input.
Dualizer Output connected to XT60-Ring Terminal Adaptor.
TVS Diode and XT60-Ring Terminal Adaptor on the COntroller Power terminals, secured by the 8mm Nuts.
Take your electrical tape and put a couple of strips over each XT30/XT60 connection to ensure they remain secure while riding!
If you have everything connected and secured move to the next step and begin reassembling everything!

Step 9
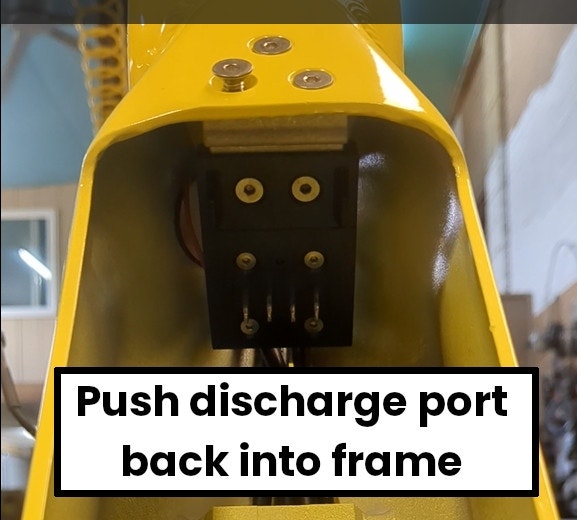
Grab the discharge port and all of the dualizer wiring. Use the discharge port to gently push the wiring into the bike.
Line up the three holes of the discharge port with the three corresponding holes on the bottom of the frame.
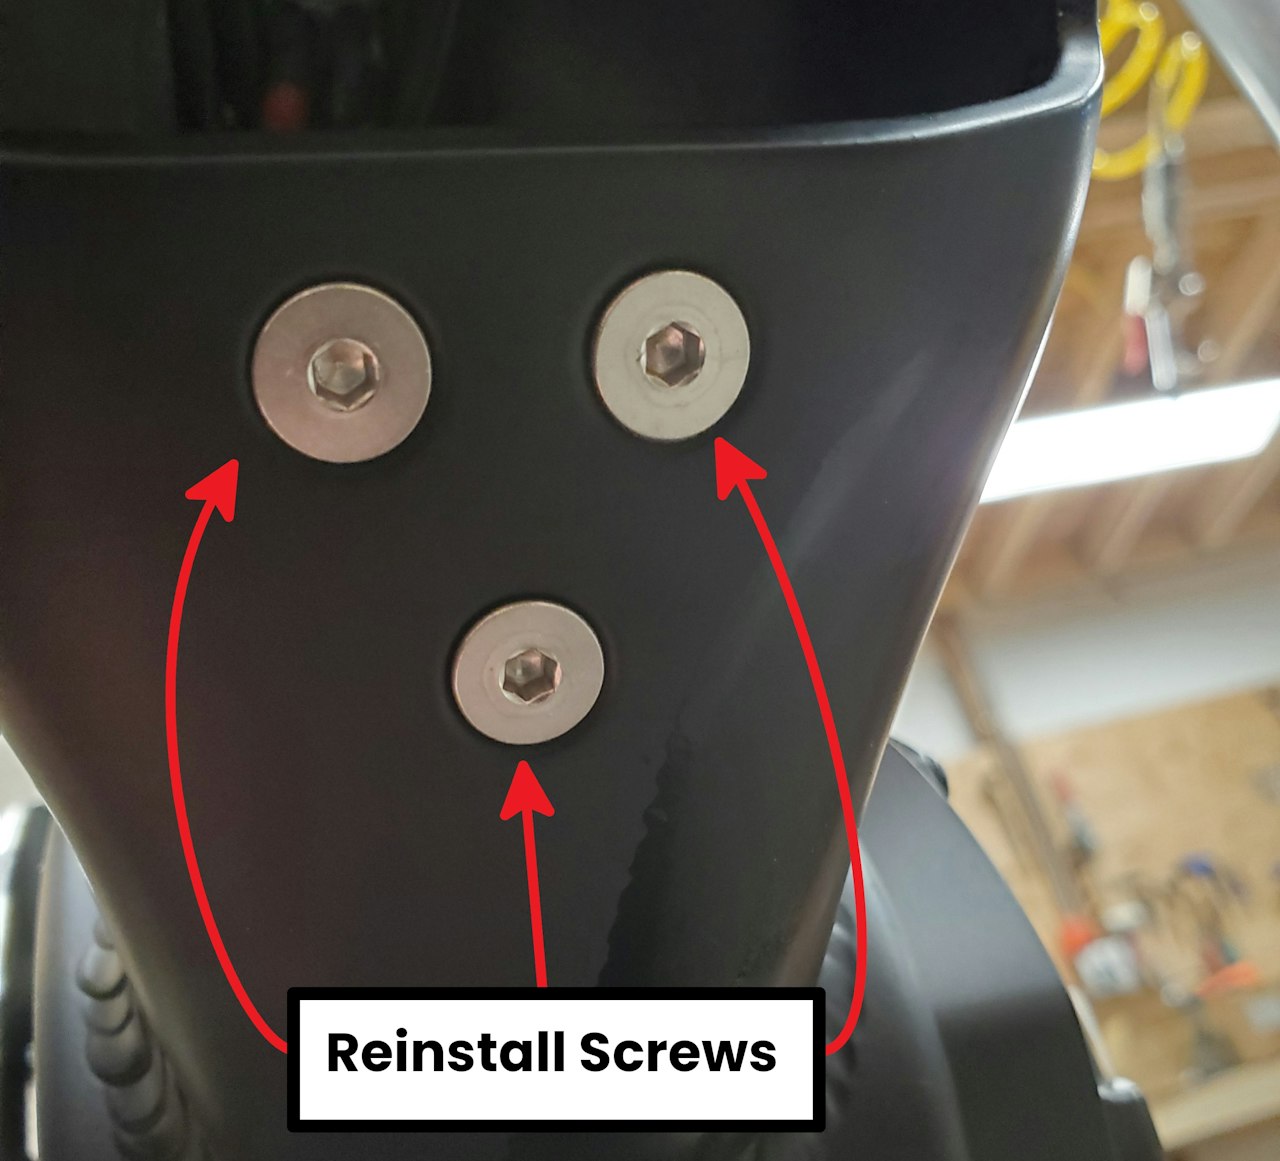
Install the screws onto the frame and discharge port to secure the discharge port back into the bike.

Step 10
Reinstall the Bash Guard onto the bottom of the motor cavity if you removed it.
Reverse the removal steps for installation!
When reinstalling put some Blue Loctite onto the screws to ensure they remain secure while riding!
Reinstall the Service cover onto the bike!
Reconnect any other wires you may have unplugged from the controller before you do this!
When reinstalling put some Blue Loctite onto these bolts as well.
Step 11
With the dualizer installed in the bike, you can now install your second, Range Extender Battery!
Check out the attached guide below for steps on installing this plate onto your bike and attaching the connector. Then put that second battery on and take your XD Duo on even further adventures!

